ARCHIVE NOTICE

My website can still be found at industrialcuriosity.com, but I have not been posting on this blog as I've been primarily focused on therightstuff.medium.com - please head over there and take a look!

Saturday 8 January 2022

Managing site certificates with NGINX and Certbot

And removing a single domain certificate without breaking everything else

Do you operate multiple domains from the same webserver? Do you have a webserver operated by NGINX? Do you have Certbot managing your certificates? This is a set of instructions for creating your certificates correctly and removing a single domain from your configuration, after I found some confusing ones that resulted in me knocking out my server for a little while…

A note before we begin

If you’re rather in a hurry to remove a domain from a messy configuration, STOP. Re-organizing your sites and regenerating your certificates is not only pretty quick and mostly painless — and required, if you want to remove a single domain without making NGINX break down and throw a wobbly — it’s very much the same process.

Organizing your existing NGINX sites

Ensure that you know which domains are configured in which site files, in particular make sure that you do not include servers for multiple domains in the same file.

To do this, look through your enabled site files under /etc/nginx/sites-enabled to find relevant server entries. While you’re there, you might want to note any certificates which are already used by those server entries; those will be the lines starting with ssl_certificate.

If you need to reorganize your site files, remember that their actual location must be in the /etc/nginx/sites-available path. To enable a site /etc/nginx/sites-available/example, create a symlink in the /etc/nginx/sites-enabled path with

> ln -s /etc/nginx/sites-available/example.com /etc/nginx/sites-enabled/

and to disable a site, remove it from the /etc/nginx/sites-enabled path with

> rm /etc/nginx/sites-enabled/example.com

Generating certificates with Certbot

Once your sites are organized in a way that each domain has its own file, generate certificates for each domain and its subdomains with

> sudo certbot --nginx -d example.com -d www.example.com

This will generate a new certificate if needed and update the site file accordingly.

To ensure that everything is as it should be, review the updated site files and then validate them with

> sudo nginx -t

To restart NGINX once you’re ready, run

> sudo service nginx restart

Removing obsolete domains and certificates

Now that your site files and certificates are configured correctly, it’s time to remove any obsolete certificates that are no longer referenced.

Run sudo certbot certificates to list the existing certificates, paying attention to their names as well as their certificate and key paths. These paths will be registered in your NGINX site files so you can review what’s active and required and be certain that the certificate(s) you’re removing are unused.

When you’re confident that a certificate example.com is no longer in use, simply remove it by running

> sudo certbot delete --cert-name example.com 

...

Originally published at https://therightstuff.medium.com.

A VSCode extension to make your code more secure

 I recently installed Red Hat’s YAML VS Code extension to assist me with Bamboo Specs, convinced by the Bald Bearded Builder that this was the linter for me (check out its schema support!). I don’t usually appreciate extensions recommending things to me (and, to be fair, I don’t know that that’s precisely what happened), but this morning a toaster popped up suggesting that I install their Dependency Analytics extension and I am SO glad that I clicked on it!


Red Hat’s “Dependency Analytics” extension is fantastic, it’s powered by Snyk’s vulnerability database and when opening one of my projects’ dependency files* I immediately saw red and was able to click my way clear in a matter of minutes**.

* My current team has projects written in all four of the supported languages, the only thing I’m personally missing is an extension for Visual Studio “proper” for C#…

** Well, okay, one of the dependency suggestions included a breaking change, but the rest of them were trivial upgrades.

Well done, Red Hat, for making safety and security just a little bit easier!

...

Originally published at https://therightstuff.medium.com.

How to open Debian archives with 7-Zip

 I cannot believe I’m writing this, but here we are: 7-Zip is perfectly capable of opening Debian package files (which are compressed using ar), but for some inexplicable reason they’ve decided to hide the control components by default.

Fortunately, opening the files properly isn’t too complicated, even if it’s not as convenient as simply opening the file: right-click on the Debian file to access the 7-Zip context menu, then hit “Open archive” with the directional arrow and select “*”.

Simple enough, I guess... if you know what you’re looking for.

...

Originally published at https://therightstuff.medium.com.

A quick-start guide to setting up a Debian guest on VMWare WorkStation 15/16 Player

I don’t know why everything needs to be subtly non-standard, but over the course of the last twenty or so virtual machine reconstructions I’ve come up with a simple checklist for setting up a Debian guest on VMWare’s WorkStation (Windows) and I thought I’d share it here.

  1. Download your Debian .iso here (I recommend the netinst CD image)
  2. Create a new virtual machine using the downloaded .iso and check that the default configuration is satisfactory (I tend to need a little more power, usually 2 CPUs does it for me). Note that increasing the size of a hard disk is for more complicated and risky than a regular user would expect, so give yourself a healthy buffer. In my experience, it’s less painful to rebuild a bigger machine than it is to extend the disk size.
  3. Install the OS — I find the graphical installer to be just fine for my purposes. The two configuration options that are the most impactful are your choice of desktop environment, I usually choose Xfce but I’m starting to like GNOME again. It’s probably a good idea to install the ssh server as well.
  4. Once installation is complete, click the VMWare button at the bottom of the screen to signal that and restart the machine.
  5. To grant yourself the ability to use sudo, open the terminal and run either
    > su -
    or
    > su -c ‘su -’
    if the first isn’t allowed (I’m not sure how to use the correct single quotes in Medium, so note that the above apostrophes aren’t correct).
    Then run
    > usermod -aG sudo <username>
    to add yourself to the sudoers group. You will need to log out and back in for this to take effect.
  6. Install the following to be able to install VMWare Tools, which enables things like copying and pasting between host and guest machines:
    > sudo apt install -y open-vm-tools open-vm-tools-desktop linux-source

Installing VMWare Tools in WorkStation Player 16

Open the Virtual Machine Settings, select the Options tab, then select VMWare Tools: select “Sychronize guest time with host” and “Update automatically”, then restart the virtual machine.

Installing VMWare Tools in WorkStation Player 15

  1. Open the VM menu, select Install VMWare Tools.
  2. Mount the VMWare Tools CD:
    > sudo mount /dev/cdrom
  3. Extract the installer to your current directory (or maybe create a subdirectory for it) using tab auto-complete in place of the ellipse:
    > tar -xf /media/cdrom/VMWareTools…
  4. Install the required build tools:
    > sudo apt-get install -y autoconf automake binutils cpp gcc linux-headers-$(uname -r) make psmisc
  5. Try to run the .pl script in the extracted folder, expect it to fail, restart the machine anyway.

At this point you should have your VM up and running and be able to copy / paste / drag files between your machines. Now go grab yourself another cup of coffee, you deserve it! 

...

Originally published at https://therightstuff.medium.com.


Friday 8 October 2021

An Impatient Developer’s Guide to Debian Maintenance (Installation) Scripts and Package Diverts


 The people involved in coming up with the dpkg scheme for installing / upgrading / downgrading / removing packages are very clever. While unintuitive to the uninitiated, the scheme is mostly logical and reasonable, though there are some points where I feel a little more effort and consideration could have made a world of difference.

“The evil that men do lives on and on” — Iron Maiden

In addition to regular installation behaviour, I needed to wrap my head around “package diverts”, which is a very clever system for enabling packages to handle file conflicts. Except that it doesn’t handle what I would consider to be a very basic use case:

  1. Install an initial version of our package.

  2. Discover that our package needs to overwrite a file that’s installed by an upstream dependency.

  3. Create a new version of our package that includes the file and configures a “package divert” to safely stow the dependency’s version.

  4. Remove the “package divert” on the file if the newer version of the package is uninstalled or downgraded to the previous version that doesn’t include it.

That last part, in italics? That’s the kicker right there. Read on to understand why.

Debian Installation Script Logic In Plain English

After poring over the Debian maintainer scripts flowcharts, I felt I had a pretty good handle on things but there’re a couple of little “gotcha”s, so I feel like it’s worth providing a brief summary of the general flow in common English.

Debian maintenance scripts are run by apt and dpkg at specific points in the installation process:

  1. If the package is being removed or upgraded (meaning that a different version is being installed, “upgraded” also means “downgraded” to Debian maintainers), the previously installed version’s prerm script is called.

  2. If the package is being installed or upgraded, the new version’s preinst script is run.

  3. If the package is not being removed, the new version’s package contents are unpacked. This will overwrite existing files if they were installed by the same package, or fail the installation if it attempts to overwrite another package’s files without a package divert configured.

  4. If the package is being removed, its files are deleted.

  5. The previously installed version’s postrm script is called if the package is being removed or upgraded.

  6. If the package is not being removed, any package contents belonging to the previous version that do not also exist in the new one are removed.

  7. If the package is not being removed, the new version’s postinst script is called.

It is important to note that if a maintenance script fails with a non-zero exit code, the package will be in a broken state that can be very difficult (sometimes impossible) to recover. From our experience, it’s best to catch all exceptions, log them, “exit gracefully” with an exit code of 0, and hope for the best.

Also from our experience, it’s a good idea for maintenance scripts to log everything to the stderr stream in order to preserve chronological order.

Debian Package Diverts for the Uninitiated

The principle of Debian package diverts is straightforward enough: when you want to include a file in your package contents that conflicts with another package’s file (i.e. the absolute paths are identical), you create a “divert” on that file so that any other package’s versions of that file is “diverted” to a different file name.

Creating a Package Divert

To create a package divert, your package’s preinst script should run the following command:

dpkg-divert --package my-package-name --add --rename \

    --divert /path/to/original.divert-ext /path/to/original

The preinst script is the place to do this because the divert must be in place before the package contents are unpacked. The dpkg-divert commands are idempotent, so having it called in the preinst of every install is fine.

Removing a Package Divert

When your package is uninstalled, it’s good practice to remove the package divert and rename the diverted files back to their original file names. It’s recommended to remove the package divert in the postrm script, which makes perfect sense when uninstalling a package because the files are deleted before postrm is called.

dpkg-divert --package my-package-name --remove --rename \

    --divert /path/to/original.divert-ext /path/to/original

When removing a package, the package’s files have been deleted already and removing a divert simply renames the diverted file back to its original file name.

When upgrading a package, however, the files are only deleted after postrm has been called. This means that a call to dpkg-divert — remove will fail because it would have to overwrite the upgraded package’s copy of the file that hasn’t yet been removed.

It also means that if you delete your package’s file in the postrm in order to remove the divert, the original package’s file will be deleted after your postrm because it will have been identified as belonging to the upgraded package.

“Insanity is contagious.” ― Joseph Heller, Catch-22

It is for this reason that if we remove the divert in the postrm during a downgrade to a version that does not include the file in its package contents, we will lose the original file. If we do not remove the package divert, we will retain the diverted original file, but it will be renamed and therefore not serve its purpose. In our downgrading scenario, the postinst script that’s run after the file removal phase of an installation belongs to the older version of the package that didn’t know about the file, or package diverts, so that won’t be of any use to us. In short, the only way to downgrade our package is to completely remove it and install the older version, which for us is simply not an option.

Epilogue

Fortunately, my team and I are in the position that the original file also belongs to a package that we maintain, and we are able to overwrite the original file in the postinst script* with confidence and impunity. That means no rolling back without removing and then reinstalling the original package, which in our case happens to be impossible.

* Of course, the file can no longer be included in the package contents with its original path or the installation will fail.

Hope you’ve found this helpful! Please share in the comments if you’ve had similar experiences, or if you know of any other workarounds!

...

Originally published at https://therightstuff.medium.com.

Thursday 7 October 2021

The Day Our Python gRPC Connections Died

Image by OpenIcons from Pixabay

On the 30th of September 2021, a heavily-used root certificate — DST Root CA X3 — expired. You can read all about it here.

According to a handful of forum posts and github issues I’ve come across, the change has caused a fair amount of pain to those unfortunates who failed to heed the warnings, but for most of us this really wasn’t a surprise. For our team, the expiration date came and went and we didn’t even notice! Until our primary in-house testing tool began failing its connection tests with the following:

Handshake failed with fatal error SSL_ERROR_SSL: error:1000007d:SSL routines:OPENSSL_internal:CERTIFICATE_VERIFY_FAILED

Our gRPC connection tests are written in Python (using the grpcio and grpcio-tools packages), and run on a variety of linux machines and Docker images. Hunting through the forums, it looked like upgrading to the latest versions of the grpcio dependencies should do the trick, but it didn’t.

At least not by itself.

We eventually determined that the problem was that DST Root CA X3 was still registered as a certificate authority, and it took so long to figure out how to remove it on Debian that I realized that I had to post about it:

To see if the DST Root CA X3 certificate is configured as a root authority, list the contents of your /etc/ssl/certs folder:

> ls -l /etc/ssl/certs | grep dst

lrwxrwxrwx 1 root root 53 Sep 11 2020 DST_Root_CA_X3.pem -> /usr/share/ca-certificates/mozilla/DST_Root_CA_X3.crt

2. Edit /etc/ca-certificates.conf and insert a ! at the beginning of the name of the DST Root CA X3 certificate to flag it as removed:

> sed -i “s@^mozilla/DST_Root_CA_X3.crt@!mozilla/DST_Root_CA_X3.crt@” “/etc/ca-certificates.conf”

To update the certificates, run the following:

> sudo /usr/sbin/update-ca-certificates -f

Note that it must be fully qualified as the /usr/sbin directory is not in the PATH by default, and it might be necessary to install the ca-certificates package using apt. The “f” of the -f flag apparently stands for “fresh”.

3. Set the GRPC_DEFAULT_SSL_ROOTS_FILE_PATH environment variable, which is required for the above changes to be respected:

> export GRPC_DEFAULT_SSL_ROOTS_FILE_PATH=/etc/ssl/certs/ca-certificates.crt

Once all that’s done, you should be able to connect successfully!

...

Originally published at https://therightstuff.medium.com.

Sunday 8 August 2021

Weaning Off The Google

 (Or, How I’m Continuing to use Google’s Products Without A Sense of Existential Dread)


My First Brush With Account Recovery Tyranny

Just over five years ago, my wife and I decided to leave Canada for South Africa, and with all the madness of the migration (after six months of being new parents with no support, we left in a big rush to be close to our family) it never occurred to me to ensure that our email accounts were all configured correctly for where we were going. When we finally arrived after two weeks of frenzied selling and packing (and deciding which half of our lives to leave behind) and two days of hard travelling, I thought I’d log in to check my emails.

Google detected that we were logging in from a different country, and wanted us to authenticate using our mobile numbers. Which had been disconnected the day before we left. As some of you may have had the misfortune of discovering, there are no human beings to speak to when attempting to recover access to a Google account, the entire process is automated and even knowing everything about your account (including your personal information, who you last communicated with, previous passwords, etc.) is no guarantee that you’re going to get it back.

We were very, VERY lucky that a really kind support agent of our Canadian mobile carrier was willing (and able) to reinstate my released number temporarily and read me back the verification codes, and even though we were forced to pay out the nose for that little service it was well worth not losing… pretty much everything that matters to a 21st century digital person.

A Reminder That It’s A False Sense Of Security

After successfully recovering our accounts, we put the experience behind us and made a mental note to sort out account verification before the next time we move. We have continued to use our gmail accounts as primary email addresses for a thousand other services, further entrenching our already-heavy reliance on a service that’s “easy come, easy go”.

What The Google Giveth, The Google Taketh Away

A few months ago I read an article on Medium, What it’s like to get locked out of Google indefinitely, and that sense of dread came rushing back as I realized that we still have absolutely no way out if we ever get stuck like that again. I’ve been a bit preoccupied with other things, though, so I haven’t really done much about it. Every once in a while I’d look at my task list, be reminded that we’re still at the mercy of a heartless, mindless system, and continue my day carrying just a teensy bit more anxiety than usual.

(If that article’s not convincing enough, please also take a look at Google has Threatened to Delete all our Google Accounts Over Nothing)

But I Like GMail!

Okay, here’s the deal. I like Google’s products. I like them better than other products. They’re good products. Good enough that I’ll ignore the data mining, the ads, even the fact that it’s Google providing them.

Honestly, sometimes I think the only two reasons I prefer GMail to any other provider are the fact that organization is by labels instead of folders, and their custom filtering is excellent. I guess that’s all any other provider would have to offer for me to be ready to jump ship.

Separating Email From Account Management

The first step to safeguarding all my other accounts was to establish one that nobody could take away from me. Fortunately, I already have a domain under my control, but then… a conundrum. What email address do I use to secure the account that manages the server that manages my email address?

Fortunately, that’s easy — multiple accounts can be used to secure that one. I signed up for a reliable, secure email address from a different provider (ProtonMail), so I at least have backup access in case either of them fails me.

Having taken care of that, I set up my own email address (which will be described in a separate post specific to configuring a postfix server — my post about Mail forwarding and piping emails with Postfix for multiple domains needs a bit of an update since I learned how to set the outgoing encryption, and even that isn’t sufficient for getting past spam filters), which now forwards to both of the other email accounts (my GMail and my new accounts email).

At this point, I was finally ready to begin the laborious process of switching the primary email of all my other accounts. It’s been an educational experience, with some services easier to update than others, but after investing a good few hours I believe I’m finally through the worst of it and have the essential services covered.

Backing Up Account Content

I’ve been considering the fact that while getting locked out of my accounts is one of my greatest fears, losing access to gigabytes of email history, documents, and videos wouldn’t be too much fun either.

During the course of the last couple of weeks, I was struggling to find an old video that I was *certain* I’d uploaded to YouTube, and eventually found it on an unclaimed channel. Google has a channel claim process, though… but it’s also fully automated. After trying and failing to claim it with my active accounts, I realized that it must have been attached to an old account that I’d deleted many years ago.

Did you know that a deleted Google account is completely unrecoverable? It is literally impossible to reinstate it, and the username will be locked forever so there’s not even a possibility of recreating it.

Over the course of this weekend I came across another Medium article, How to Quit Gmail and Reclaim Your Privacy. There’s a lot of good advice in there, but No. 7, “Don’t Delete Your Old Address”? Consider that a golden rule.

Personally, I have a terabyte drive (or two) that I use for backups, but I’ve come to the conclusion that I’m not nearly as capable of protecting my physical disks as the professionals. I’m a big fan of DropBox, which has an excellent interface and syncing tools, but I’m not a fan of their pricing models. I’ve now resorted to uploading my backups to an AWS S3 bucket, treating it as cold storage only to be used in case of emergency.

For the low prices (for my purposes, anything from the standard storage plans to glacier will do), and the safety guarantee, I’m sold.

Next Steps

I’ve now set myself a regular reminder to download my Google data and upload it to my backup bucket. At this point, I’m considering this little adventure complete and I’m ready to relax and enjoy the remainder of our long weekend in celebration of South Africa’s National Women’s Day.

I hope this article has been helpful, if you have anything you’d like to add (or disagree with) please let me know in the comments!

...

Originally published at https://therightstuff.medium.com.

Friday 6 August 2021

Bamboo YAML Specs Tips and Tricks (For Fun and Profit)

A cute panda eating bamboo
[UPDATED 2021.10.01 WITH ADDITIONAL DEPLOYMENT PLAN LEARNINGS]

Introduction

“In for a penny, in for a pound” — that’s our team’s current approach regarding Atlassian’s products. As part of our efforts to code as much of our infrastructure as possible, we’ve recently begun migrating old build plans to Bamboo Specs and, as non-Java devs who don’t want more headaches than are absolutely necessary, we’ve chosen to work with the Bamboo Specs YAML offering.

YAML specs are pretty great. Migrations are assisted by the fact that manually-created plans will show you their YAML translations, so in most cases a simple copy/paste is all you need. I mean, aside from migrating to linked repositories and ensuring they’re configured correctly…

Having said that, Bamboo’s YAML specs are an incomplete product with undocumented critical features, and fail to provide out-of-the-box support for a surprising number of standard use cases that one would expect software engineers building software for other software engineers to appreciate the value of. 
They’re still pretty great in spite of that, but overcoming the limitations of incomplete specs definitions and deployment plans is not exactly intuitive. This article attempts to cover some of the missing pieces and suggest some workarounds that we’ve found useful.


Configuring a linked repository for Bamboo Specs

Bamboo Specs require the configuration of a linked repository. Head to settings -> linked repositories (this will require admin permissions) to create or update a linked repository configuration. The two most important steps to be taken here are as follows:
  1. Determine which branch of your repository will be used by Bamboo to read the specs file. Only one branch can be considered the source of truth, my personal recommendation is to make it the development branch.

  2. Two sets of permissions need to be configured correctly in order for Bamboo Specs to be able to do their job:

    a. First, the Bamboo project must give permissions to the linked repository to create and modify the build and deployment plans. Head to the project you want your linked repository to operate in, go to Project Settings, then Bamboo Specs repositories, and add the linked repository.

    b. Under the Bamboo Specs tab of the linked repository, enable both Access all projects and Access all repositories. I’m pretty confident that this requirement is not a security best-practice, but in my experience Bamboo Specs won’t work without them.

Testing Bamboo Specs

When experimenting with changes to the specs, I’ve found it useful to do the following:
  1. Create a testing branch (a feature / bugfix branch).

  2. Change the build and deployment plans’ names and keys and push them to origin so that your changes won’t overwrite the existing plans.

  3. Set the testing branch to be the linked repository’s branch in the General tab and proceed with your changes.

  4. Once you’re happy with the changes and they’ve been reviewed: set the linked repository’s branch back to the development branch, then revert the plan names and keys in the testing branch to the existing plans’.

  5. Delete the test plans manually.

Unexpected Limitations of Bamboo Specs

Plan dependencies

The most glaring omission in the YAML specs is the inability to set up plan dependencies. While we were initially upset by this, we quickly realized that at the end of the day plan dependencies are a nice hack that we shouldn’t really have been relying on in the first place. Bamboo appears to encourage the download of artifacts from matching branches on other build plans, but this can quickly break down into chaos with dependency versioning and management. I warmly recommend using Bamboo artifacts for build debugging and deployment plans exclusively, and proper package repositories for storing and retrieving versioned build artifacts.

When exporting Bamboo Specs from existing plans, build plans and deployment plans are not considered strongly related so you will need to gather and combine the specs from both into a single file. To do this, copy in the deployment plan specs beneath the build plan specs, retaining the --- as separators.
NOTE: the ordering of the sections is important! The build plan definition must be followed by the build plan permissions, then the deployment plan definition(s), with each deployment plan definition followed by a section for its permissions. See the outline at the end of the article for clarity.
An interesting omission is the inability to include unset plan variables. This actually makes sense, as manually maintained plans need some way to ensure that they’re all using the same variable names, but with Bamboo Specs it’s really on you to be consistent and it’s obviously much* easier to search through a single file than it is to hunt for variables across different plan branches via the Bamboo interface.

* infinitely easier

Deployment Plans — sharing build variables and tooling

The principal idea behind a deployment plan is to separate deployment from the build process. Bamboo implements deployment plans as distinct entities with entirely different environments, with the intention that your only interaction with the related build plan is to download your artifacts from it.

For us, this proved problematic as we require shared environment variables and tooling to deploy our builds. To work around this, we required the following mechanisms:
  1. Environment variable injection. Early in our build plan tasks, we prepare an environment variable file in the following format and include values like build versions and git branch names.

    version=1.0.2
    git_branch=feature/example


    WARNING: variable values MUST NOT be surrounded by quotations, as this leads to unpredictable behaviour.


    It is recommended to use the inject namespace for injections. When the scope of the injection is RESULT, the variables will be available to all subsequent build tasks as well as the attached deployment plan. In Bamboo Specs they’ll be available in the form ${bamboo.inject.git_branch} and in inline scripts as $bamboo_inject_git_branch (on Unix agents) or %bamboo_inject_git_branch% (on Windows agents).

    One of my favourite uses of this technique is the ability to name releases automatically based on the build version (see the following section for the example).

  2. Deployment plans are not really designed to use git directly, but we have found that we sometimes require non-build folders to be available for deployment, such as documentation. In these cases, we simply zip the desired folders and make them available as artifacts as well.

  3. Running the deployment in a docker container. I find it disconcerting that such an extremely useful feature is undocumented! Deployment plan environments can be configured to run in a docker container just like a build plan, which provides us with all requisite tooling and context.

    DevEnvironment:
      docker:
        image: golang:1.16.6-buster
        docker-run-arguments:
        - --net=host
      tasks:

Linking multiple branches to a single deployment plan

Ironically, while deployment plans are supposed to operate independently from build plans, they only really function well when linked to specific build branches. If your intention is to build once, then deploy the build artifacts to multiple stages, you're out of luck!

UPDATE: it turns out we missed an important option! If release-naming is set to an environment variable, it only works for the specified branch (even if that specified branch is the default branch). If you want release-naming to be set to an environment variable for any branch, then it needs to be configured as follows:

release-naming:
  next-version-name${bamboo.inject.version}
  applies-to-branches: true

The disadvantage of using a single deployment plan is that the link to the deployment plan will only be available from the default build plan branch, but in my experience this is a very minor price to pay for the simplicity. The alternative - a single deployment plan for each branch of interest - is not only messier, but is also annoying to configure as you have to know the branch keys in advance so the branches cannot be automatically managed (plan branch keys are autoincremented and uneditable).

Regardless of your choice, it's probably a good idea to handle your branch management manually:

branches:
  create: manually
  delete: never

Putting it all together

My recommendation for the general outline of a YAML specs file is as follows:

---

version: 2

# build plan definition

plan:

  project-key: PROJECTKEY

  key: PLANKEY

  name: Product Name

  ...

branches:

  create: manually

  delete: never

---

version: 2

# build plan permissions

plan:

  key: PROJECTKEY-PLANKEY

plan-permissions:

  ...

---

version: 2

# deployment plan definition

deployment:

  # NOTE: deployment plan names must be unique

  name: Product Name

  source-plan: PROJECTKEY-PLANKEY

release-naming:
  next-version-name${bamboo.inject.version}
  applies-to-branches: true

...

---

version: 2

# deployment plan permissions

deployment:

  name: Product Name

deployment-permissions:

  ...

These are the tips and tricks that have helped us overcome our biggest migration challenges so far, I hope they can help others as well. If you have any others that come to mind, or improvements over the above, please let me know in the comments!
...

Originally published at https://therightstuff.medium.com.

Sunday 20 June 2021

How Shakespeare’s Four-Hundred Year-Old Sonnets Drove Me To Madness

And How They Tell Me They’re Performing As Intended

A drawn image of a rose being thrown into Shakespeare's grave
Image taken from a sample page of Shakespeare’s Sonnets: A Graphic Novel Adaptation

Something magical happened on the evening of the 28th of January, 2012, just shy of four centuries after the Bard’s body had been buried. I brushed dust off some old words with my fingertips, I breathed out their spells as I read, and a real-life Djinn popped out.

Standing Over A Grave

I was halfway through the first semester of the second year of my Master’s in English Literature at the Tel Aviv University (which I left incomplete with only a handful of credits to go, but that has nothing to do with this story) and my lecturer, Dr Noam Reisner, had warned us that his seminar entitled “Sonnets and Sonneteers” would either see us quitting, or losing our minds. While I cannot speak for the rest of the class, let me assure you that in my case his assertion was entirely on the nose.

After weeks covering the history of sonnets, their techniques and their makers, we studied a number of Shakespeare’s sonnets together in the classroom and I’d found myself fixated on an aspect of the first sonnet that I simply couldn’t shake: while reading and re-reading it, it continued to produce a nagging sensation that I was standing over a grave. I could not for the life of me tell you what specifically had that effect on me, but somehow I was certain that it was significant. That feeling had inspired me to make the Bard’s sonnet sequence the focus my mid-term paper, a decision that would forever alter the course of my life.

Just like most people, I’d encountered quite a few of Shakespeare’s sonnets before, back in high school where our English teachers forced them down our throats until our gag reflexes kicked in, during a number of university courses, at awkwardly inappropriate times in a few movies, but we’d always read selections of them, never all together and never in sequence. I strongly believe that a lack of context and continuity is a factor in why the sonnets are largely under-appreciated today; that, and the fact that the conventional reading that’s taught to us is so narrowly focused on sex and sexual relationships that it thoroughly distracts from everything that makes the text truly magical and terribly awe-inspiring.

We’re talking here about what is arguably the most beautiful, most insightful, most heartbreakingly tragic writing in the entire history of the English language.

Revelation

As a part-time student / part-time freelancer, my days generally extended until about 3 or 4am and I was used to being fairly sleep-deprived, which may or may not have contributed to my mental “looseness” at the time. It was evening when I sat down to prepare for my paper — I know this only because I keep a journal, and my first entry after my discovery was written around 10pm.

I recall that I was just shy of a quarter of the way through reading the sonnets sequentially for the very first time. In a single, sudden, reality-warping moment I uncovered the first amazing secret, something so simple but so powerful that it made the world fade away into a fuzzy background and my heart beat in my ears as the words leap out of the page to grab me by the eyeballs: whenever Shakespeare wrote “thee”, or “thou” in the sonnets, he was referring to the reader.

He was referring to the reader.

He was referring to me.

For the longest time, Shakespeare’s sonnets have been revered or reviled, mystifying and frustrating fans and critics and students alike who have formed some pretty crazy theories about who the Bard’s young male lover was and who his mistress could have been. This interpretation of the sonnets is the basis for all the theories concerning Shakespeare’s sexuality and the common assumption that he was unfaithful to his wife. Over the course of the semester Dr. Reisner had drilled into us that when analysing a sonnet, it’s crucial to identify the speaker and the addressee: those two pieces of information can change everything about a sonnet’s message, and in this case they changed everything about my relationship to Shakespeare’s works.

For what was quite possibly the very first time in the four-hundred-and-three years since their publication, the sonnets had found their mark. Shakespeare himself was speaking directly to me from beyond the grave, his ghost conversing with me and through me and I — in my role as reader and imaginer — was giving him what he desired most: a willing host; a willing heart and mind and pair of eyes to possess. This was really happening, a bridge had formed between the then and the now, a wormhole through an eternity between the living and the dead, and my world was turned inside out: Shakespeare, in his poetry, was addressing me, instructing me, even foretelling my experience in ways that couldn’t possibly be real, but absolutely and without any doubt were.

I read on, my mind racing faster and faster, my sense of reality spinning in an ever-expanding inward spiral. According to my journal (my next entry was five hours later), I eventually put aside the reading to get some paid work done, already confident that I knew who Mr. W. H. from the sonnets’ dedication was, then finished up and tried to go to bed. An hour after that, I wrote yet another entry because there was no way that I could sleep. I vividly recall climbing into bed with my phone (I was using a Shakespeare app at the time) and holding it over the edge of the bed so as not to wake my girlfriend while I continued to read; I was utterly mesmerized. The more I read, the more convinced I became that I had just managed to unravel one of the greatest and most celebrated mysteries in English literature.

Little did I know, I had only peeled back the first layer of the onion.

Beyond The Looking Glass

I barely slept that morning, having read through the first third of the sequence over and over again until 5am just to be sure that I wasn’t making a huge mistake, each pass reinforcing my confidence in my reading. A couple of hours later I dragged myself out of bed and through an action-packed day. The following evening I dove back in and by 3am had successfully peeled back the second layer: Shakespeare wasn’t just talking to the reader, he was talking to the sonnets themselves. And the sonnets were talking back.

I was so excited to discuss my theory with Dr Reisner, but every single thing about my reveal went wrong. Firstly, I was unprepared and my theory was completely lacking in academic rigour. I’d figured out an enormous amount in a span of two days, but there were plenty of details missing — most notably, I hadn’t identified the Dark Lady of the second half of the sequence yet — and at the time (in my state of sleep deprivation and overwhelming, palpitation-inducing inspiration and obsession) I couldn’t even begin to consider what would constitute reasonable evidence, let alone form coherent sentences out of the tornado of ideas spinning around my skull.

I’ll never forget one of the reasons I simply couldn’t reign in my enthusiasm or keep my mouth shut: we happened to be discussing sonnet 128, and I simply could not sit still while my classmates made wild (albeit very interesting) guesses while the premise of the sonnet was so clear to me! To be clear, that was my first reading of sonnet 128, ever, and I’m sure there’s a lot more in there if we look deeper. My analysis stunned the class — and not in a good way — and I had no answers to the barrage of questions fired back at me. It was made perfectly clear to me by all present that I was probably completely off my rocker. Dr Reisner’s use of my assertions to demonstrate how not to argue was memorably instructive.

Weeks passed by, and as I dived into books by established critics (particularly memorable reads were The Arden Sonnets by Katherine Duncan-Jones, Shakespeare’s Sonnets by Stephen Booth and The Art of Shakespeare’s Sonnets by Helen Vendler) and worked on my first paper, I’d come up with some very stable theories and some very peculiar ones (one exciting, but ultimately fruitless rabbithole involved Shakespeare’s alleged use of narcotics). Ultimately, that paper was able to establish an initial framework for understanding the sonnets, even though it generated a lot more questions than it answered: the sonnets are a dialog, they are a three-way conversation between themselves, their author and their reader, and many of their verses communicate to all three at the very same time.

The Girl Next Door

That first paper was an exciting start, but not sufficiently convincing. During the second semester of 2012 I attended a course called “Shakespeare’s Narrative Poetry” by Professor Shirley Sharon-Zisser which gave me a wonderful opportunity to connect the dots with two of Shakespeare’s poems: “A Lover’s Complaint”, the poem that was originally published along with Shakespeare’s Sonnets, and “The Phoenix and the Turtle”.

There’s something immensely profound in witnessing a prophecy come true in A Lover’s Complaint, as I realized that the fickle maid of the tale… was me, along with every other reader of the sonnets who has been drawn to their power and found themselves vexed by it.

Similarly, there’s something quite surreal about reading a work that is, according to Wikipedia, “widely considered to be one of his most obscure works”, and wondering how it could possibly be so misunderstood when it is thematically identical to the sonnets!

The second paper aimed to tie in the themes of the sonnets and A Lover’s Complaint, and it succeeded. The next step would be to evolve these two papers into my master’s thesis: fortunately, while Dr Reisner may not have believed me at first, he didn’t not believe me, and when I requested his support for my thesis topic he was kind enough to jump on board and agree to advise.

Our meeting was a memorable one, my favourite part being the moment in which I learned that other people’s reactions to the recent birth of his son had convinced him that what I was seeing in the sonnets — a father’s love for his son, and a son’s elevated status as legacy-bearer — was just as relevant today as it was back then.

Epilogue

For a number of reasons, professional and personal, I gave up my studies when I decided to make for the snowier pastures of Montréal. While this slammed the brakes on my thesis, I’d been putting a lot of thought into the fact that the sonnets’ medium — words — was not as ideal a method of communicating as their author had hoped.

The sonnet sequence has a number of themes and threads running through them, most of the sonnets dealing with a few different themes at a time, and each sonnet has up to three audiences simultaneously. This is too much for any reader to keep in mind all at once, and it’s too much to cram into moving pictures in a coherent manner.

There is one medium that’s rising in popularity for “real” literature*, though, and that’s the graphic novel. It’s a medium that enables writers and artists to combine and recombine text and imagery in infinite ways, and gives the reader the ability to consume the content at their own pace, and read backwards as well as forwards. This, then, promised to be a worthwhile avenue to venture down in my pursuit of justice for the Bard.

* Arguing the definition of “good” or “real” literature is out of scope for this article, suffice it to say that I’m highly judgemental of anyone who claims that an entire medium could be somehow less valuable than another.

While planning a script for a graphic novel adaptation of the sonnets while in Canada, I came across something that made me revisit Arthur Golding’s translation of Ovid’s Metamorphoses which Shakespeare was fond of using as a reference, and it was immediately apparent that he had not only used the story of Narcissus and Echo as a framing device for the entire sequence, but had frequently quoted it directly! More pieces of the puzzle fell into place, and I raced to find an artist to collaborate with.

...

It has been nine and a half years since that fateful night, and five years since I met an artist both capable of and interested in helping me bring these crazy comics into existence. As I write this, after a couple of years struggling to get started, we have recently published the twelfth page of the graphic novel adapation and we’re finally making slow but steady progress in spite of the pandemic and its fallout. Last year I published a book covering the first 25 sonnets based on my podcast of the same name, and over the past couple of years I’ve embarked on the admittedly weirder project of tattooing images representing all 154 of Shakespeare’s Sonnets onto my body (inspired by my beautiful, supportive, and very tattooed wife).

Why, though?

Why would someone go to such lengths for an arguably failed four-hundred year old poem?

My answer is simple: Because Shakespeare asked me to. Because I now have a son of my own, and I cannot stand idly by the grave injustice that has been done to his and his sons’ memory. Because the Bard has earned the right to a magnificent legacy with a masterpiece so far ahead of its time, that it is even amazing by today’s standards.

...

Originally published at https://therightstuff.medium.com/.

Wednesday 5 May 2021

Crypto Matters - Just Not For The Reasons You Might Think

Photo by Suzy Hazelwood from Pexels

I watched Bill Maher’s recent diatribe against crypto a day or two ago, and suddenly my feeds seem to be filled with people decrying blockchain phenomena like NFTs as pyramid schemes and nonsense.

They’re not entirely wrong.

Fiat vs Crypto

It’s important, however, to take a good, long look at our existing “fiat” currencies before taking potshots at a technology that is fundamentally the same, but easily better in a myriad of ways.

Let’s begin by defining money, a fiction that enables us to transact across domains. It’s a fiction that’s sufficiently decoupled from reality that we can make fair transactions where that wouldn’t otherwise be possible: it’s not easy to determine the value of an item of clothing in coconuts, or units of electricity. Once upon a time the value of money was tied to scarce natural resources, but for decades it’s been completely artificial, controlled and manipulated by organizations and forces that generally do not have “the greater good” at heart.

Cryptocurrency, on the other hand, by design has no master. Anyone can mine, anyone can play. If I can earn it, I can spend it, and the requirements for setting up a wallet and transacting are so minimal that the most basic of smartphones can handle it with ease. It’s also much more complicated to steal from someone than cash, and nobody needs a bank to let them participate in the economy, or to rob them of huge portions of their paycheques when sending funds to their families back home.

Fantasy vs Reality

Over the past ten years the idea of cryptocurrency has been creeping into the collective conscious, and the enthusiasts who “get it” have been working tirelessly to usher in an envisioned utopia in which we all transact in a wide variety of crypto tokens, where nobody is “unbanked”, a world in which our governments and credit card companies no longer enjoy the leverage they currently have and we can live our lives in a virtual-cash-based economy where privacy reigns and nobody can freeze our bank accounts or make up silly fees and charges for using them.

A world where nobody can “cook the books” because everything is written into an open ledger. A world where reliable, secure, anonymous voting mechanisms are built in to the very fabric of the networks we use.

These dreams are all very well, but they clearly have not materialized… yet. For more than a decade Bitcoin has been considered the literal and figurative “gold standard” of crypto, and where its popularity meets with somehow unanticipated greed we see the energy invested to mine Bitcoin exceeding that of small countries. Ethereum arrived later on the scene with its promise of smart-contracts, an incredible innovation that opens up fin-tech and safe remittance, micropayments and the ad-free production and consumption of content… but transaction volumes are severely limited, encoded in its ridiculously high “gas fees” that make it impractical to make transfers of anything less than small fortunes.

This is not a time to use crypto. This has been a great time to speculate about crypto, as evidenced in the crazy bubbles of the past couple of years, but this is not a time to use crypto.

The Irony

At present, there simply isn’t inherent value in crypto. Money isn’t worth anything if you can’t buy things with it. Most of the engineers who work with crypto are biding their time building wallets and exchanges because that’s what the market will pay them for, but that’s not what makes them excited about crypto. In fact, hoarding and HODLing are holding crypto back from its true purpose — seamless traceless borderless digital payments for everyone — which means that the behaviour of investors is actually preventing crypto from developing the inherent value that speculators have been banking on!

Working vs Staking

For those of you who aren’t familiar: the underlying reason why blockchain mining is so power-hungry, why transaction volumes are so limited and fees so high, is because the mechanism that protects the blockchain is what’s known as “Proof of Work”. To make it nigh-impossible to cheat the system and manipulate the blockchain, miners are required to perform computationally expensive calculations that are simple to validate, and whoever succeeds first achieves the right to write [sorry] the transaction block.

Proof of Work is an extremely clever concept that made perfect sense ten years ago but, sadly, its creator(s) never foresaw just how poorly it would scale.

The New Thing in blockchain tech is Proof of Stake, and by “new” I mean almost as old as blockchain technology itself but not implemented where it matters most. Unlike Proof of Work, Proof of Stake requires “staking” your crypto to buy the right to validate the transactions — in Ethereum’s case, stake 32 ETH and you get to play miner, only you get paid for doing your part without having to set the Earth on fire. Or your brain.

For a (in technological terms) long time Ethereum has been promising to evolve to Ethereum 2.0, but the first real measures were only put in place towards the end of 2020 and according to today’s news things are finally speeding ahead towards this Brand New Day.

Where to with crypto?

After all this preamble, what’s the real takeaway?

It doesn’t matter whether Bitcoin’s value hits $100,000, $1,000,000, or crashes and burns and hits $1, nor does it matter what a single Ether is valued at. It doesn’t matter if you bought in early and made your fortune, or if you missed the boat completely and even now believe it’s too late for your first foray into crypto (it’s not).

What does matter is that crypto has a function, and that function is desperately needed these days, especially for the billions of people who aren’t being served by the existing financial institutions. Personally, I cannot wait for a time when I can be paid and pay safely and instantly, whether for groceries, rent or coffee, and the idea of being able to transact outside of my government’s reach is hugely empowering. I‘m excited that we’re so close to money markets that are fair and inherently non-discriminatory. I’m excited to start diving in to new tech that solves the currently-inconceivable problems of living in societies that don’t run on borders and taxes.

Things may get weird (like the current NFT craze) while we learn how to use crypto, but with a brief look back over our shoulders it becomes apparent that no technology ever got introduced without us experiencing some kind of adjustment phase.

At least, I hope people’s obsessions with selfies is just a phase.

Monday 5 April 2021

Choosing the right password manager to keep your secrets safe

Photo by George Becker from Pexels

If you’re not using a password manager by now, you should be. Ever since reading the xkcd: Password Strength comic many years ago, I’ve become increasingly frustrated by how the software industry has continued to enforce bad password practices, and by how few services and applications apply best practices in securing our credentials. 

The main reason for password reuse or using poor passwords in the first place is because it’s way too hard to remember lots of good ones.

By forcing us to remember more and more passwords with outdated rules such as demanding symbols, numbers and a mix of uppercase and lowercase characters, most people have turned to using weak passwords, or reusing the same passwords or patterned recombinations of those passwords and leaving us vulnerable to simple exploits.

I recently learned about ‘; — have i been pwned?, and I was shocked to discover that some of the breaches that included my personal data included passwords that I had no idea were compromised… for years. Then I looked up my wife’s email address, and together we were horrified.

Lots of those compromised credentials were on platforms we didn’t even remember we had accounts on, so asking us what those passwords were and whether we’ve reused them elsewhere is futile.

A developer’s perspective

As an experienced software engineer, I understand just enough about security to be keenly aware of how little most of us know and how important it is to be familiar with security best practices and the latest security news in order to protect my clients.

I will never forget that moment a few years back when, while working for a well-established company with many thousands of users and highly sensitive data, I came across their password hashing solution for the first time: my predecessor had “rolled his own” security by MD5 hashing the password before storing it… a thousand times in a loop. As ignorant as I was myself regarding hashing, a quick search made it clear that this was making the system less secure, not more.
This was a professional who thought he was caring for his customers.

In 2019 I put together an open-sourced javascript package, the simple-free-encryption-tool, for simple but standard javascript encryption that’s compatible with C#, after finding the learning curve for system security to be surprisingly steep for something so critical to the safe operations of the interwebs.

The biggest takeaways from my little ventures into information security are as follows:

  1. Most websites, platforms and services that we trust with our passwords cannot be relied upon to protect our most sensitive information.
  2. Companies should not be relying exclusively on their software developers to protect customer credentials and personal data.
  3. As a consumer, or customer, or client, we need to take responsibility for our passwords and secrets into our own hands.
  4. Trust (almost) no-one.

What’s wrong with writing down my passwords on paper?

It’s so hard to remember and share passwords that lots of people have taken to recording them on sticky notes, or in a notebook, and I cannot stress enough just how dangerous a practice this is.

First, any bad actor who has physical access to your desk or belongings and (in their mind) an excuse to snoop on you or hurt you, will generally be privy to more of your personal data than some online hacker who picks up a couple of your details off an underground website. This means that it will be far easier for them to get into your secrets and do you harm.

Second, and far more likely, if those papers are lost or damaged you’re probably going to find yourself in hot water. For example, I’ve run into trouble with my Google credentials before and locked myself out of my account, and even after providing all the correct answers it was still impossible for me to get back in. There are many faceless services like this, so even a simple accident (or just misplacement) and you could find yourself in a very uncomfortable position.

What is a password manager?

A password manager is an encrypted database that securely stores all of your secrets (credentials or others) and enables you to retrieve them with a single set of credentials and authentication factors. Modern password managers tend to provide the ability to synchronize these databases on multiple devices and even inject your credentials directly where you need them.

Things to consider when picking a password manager

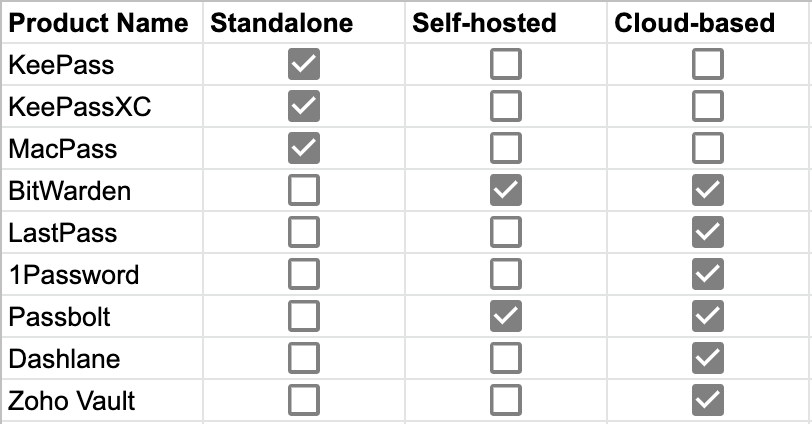
Standalone, cloud-based, or self-hosted

For individuals who aren’t prepared to trust the internet (or even their local networks) with their secrets, there are password managers that are designed to be stored and accessed locally. These are essentially interfaces to encrypted database files that reside on your local hard disk, and you are responsible for backing them up and copying them between devices. A word of caution: if you’re synchronizing these databases by uploading them to a file sharing service like Dropbox, you’re operating in a way that’s likely less secure than using a cloud-based service.

Cloud-based solutions are services provided by an organization that allows you to store your secrets on their platforms and trust in their experts to secure them. While user costs may vary, they don’t require any effort when it comes to maintenance, syncing between devices and backing up and they usually provide great interfaces with integrations for desktops, browsers and mobile phones.

An important aspect to take into consideration when it comes to cloud-based solutions is the provider’s reputation and history of breaches. Nobody’s perfect in the world of security — security is a perpetual arms race between the white hats and the black hats — but what speaks volumes is how an organization comports itself when things go wrong. Do they consistently apply best practices and upgrades? Do they react to breaches quickly, transparently, and in their clients’ best interests?

Self-hosted solutions are where you or your organization are required to install and maintain the service on a web server, preferably on a secure internal network, so that your users (your family or coworkers) can operate as if it’s a cloud-based solution. These are generally cheaper for businesses, but somewhat more difficult to maintain and often less secure than cloud-based solutions (depending on the competence of whoever’s responsible for your network), but from a user’s point of view it amounts to the same thing.

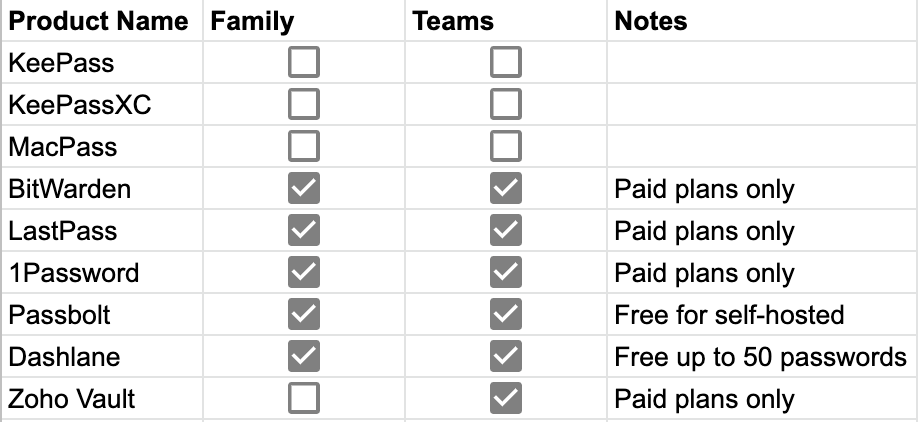
Password sharing for family and teams

Some people need to share credentials more than others. In my family, my wife and I are consistently sharing accounts so it doesn’t make sense for us to have individual duplicate copies of our shared accounts in each of our password accounts, and the same goes for me and my coworkers when it comes to our developer and administrator passwords for some of our products and service accounts. For these uses, it’s a good idea to use a solution that facilitates password sharing, and some of the services make it easy to set up groups and group ownership of credentials.

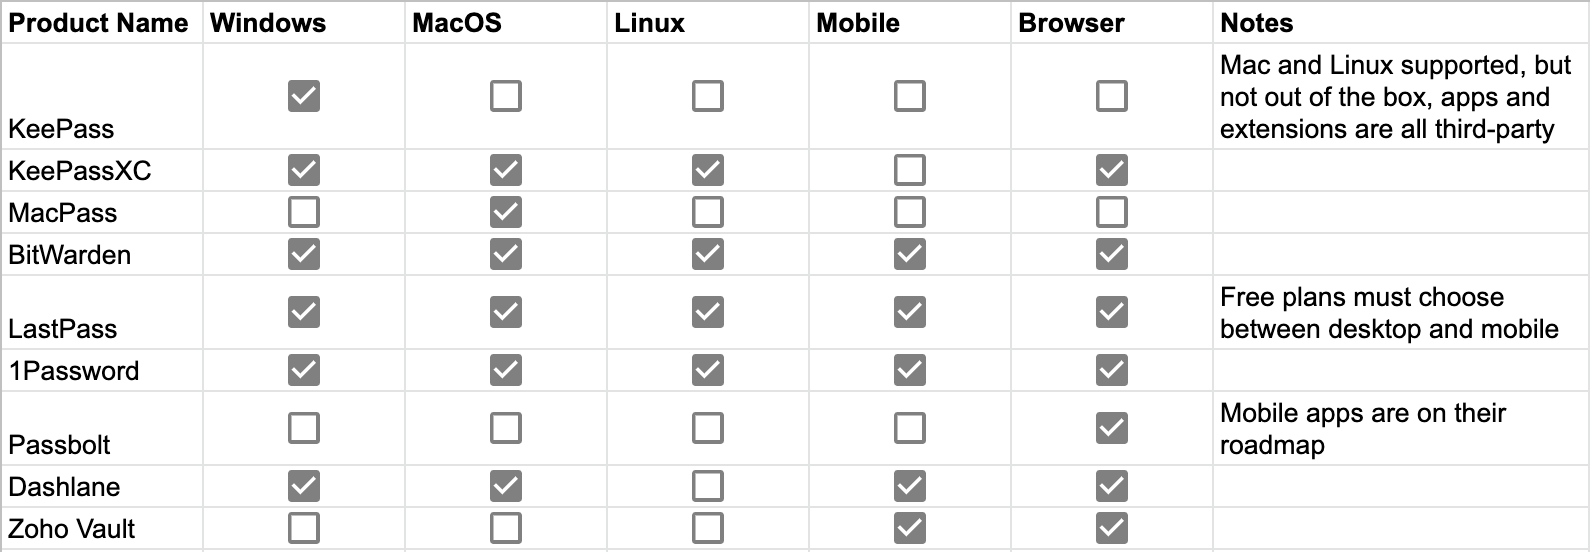
Mobile, OS and desktop browser support

Many password managers provide varying levels of integration for the wide variety of devices and browsers available — some solutions simply won’t give you any more than the barest essentials. Some people prefer to be able to unlock their passwords using biometrics, some prefer not to use their mobile devices at all, so before looking at the feature comparisons it’s worth giving a minute or two of thought towards how you intend to use it.

The good news is that most of the major solutions allow exporting and importing of your secrets, so if you have any doubts about your decisions you probably won’t have to worry too much about being locked in.

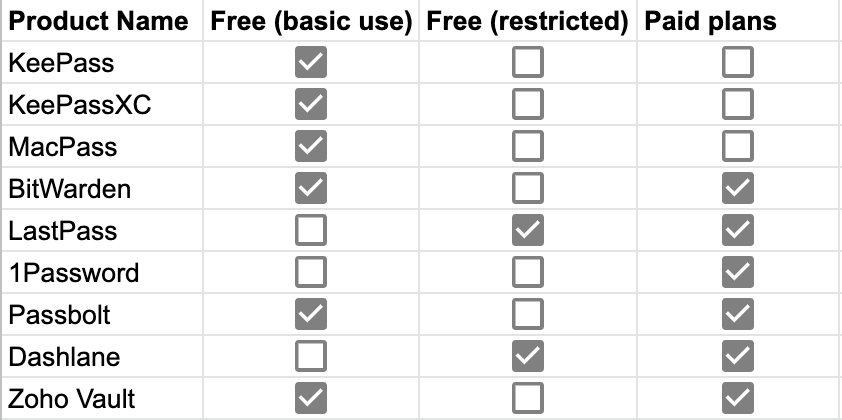
Free vs Paid

While pricing is obviously an important factor, I feel like one should first have an idea of what features one needs before comparing on pricing. Most of the solutions offer similar prices per user, with some exceptions.

This is one of those rare situations where, depending on your requirements, you might actually be better off with a free product!

The Feature Comparison

Standalone, cloud-based, or self-hosted

Password sharing for family and teams

Mobile, OS and desktop browser support

Free vs Paid

Summary

With the wide variety of needs and options available, each solution listed above has its benefits and its tradeoffs. I hope you’ve found this helpful, if you have any questions, corrections, comments or suggestions I look forward to reading them in the comments below!